
Table of Contents
- Why Surface Prep Decides Paint Longevity
- How to Pressure Wash House Siding Correctly
- Scraping, Sanding, and Repairing Damaged Wood
- Caulking and Sealing for a Watertight Surface
- Best Exterior Paint Preparation Tools
- Material-Specific Prep: Wood, Vinyl, and Stucco
- How Long Does Exterior House Prep Take?
- Final Inspection and Priming Before Paint
- Frequently Asked Questions
Last Updated: September 7, 2026
Every homeowner has seen it: a fresh coat of paint that bubbles, peels, or flakes away within a year or two. The culprit is rarely the paint itself. The real cause of premature paint failure is almost always an unprepared surface. Understanding the best ways to prepare home exterior surfaces before you open a single can is the difference between a finish that lasts a decade and one that fails within a season.
Proper surface preparation is the foundation of any durable exterior paint job. This guide breaks down the essential steps, from pressure washing to priming, so you can achieve professional-grade results that protect your home and your investment.
Why Surface Prep Decides Paint Longevity
Paint is only as strong as the surface beneath it. When you apply paint over dirt, mildew, or loose material, you create a weak bond that fails quickly. This is why surface preparation is the single most important factor in paint longevity, outweighing even the quality of the paint itself.
The common failure points all trace back to prep: peeling paint from inadequate scraping, blistering from trapped moisture, and alligatoring from incompatible layers. Each requires stripping back to bare wood or a sound surface before repainting. Skipping this step means your new paint inherits every flaw of the old.
A properly prepared surface also affects how the paint cures and adheres. Clean, dry, and slightly rough surfaces give the coating something to grip. This mechanical adhesion, combined with chemical bonding through primers, keeps paint attached through freeze-thaw cycles and intense sun exposure. According to the Paint Quality Institute’s guidance on surface preparation, most coating failures can be traced directly back to inadequate surface preparation.
How to Pressure Wash House Siding Correctly
Pressure washing is the first and most critical cleaning step. The goal is not to blast the paint off but to remove the accumulated grime, chalk, mildew, and loose particles that prevent adhesion.
Use a pressure washer with a wide fan tip, typically 25 to 40 degrees, and keep the nozzle moving in smooth, overlapping passes. Hold the wand 12 to 18 inches from the surface to avoid etching wood or forcing water behind siding. A common mistake is holding the nozzle too close or at a sharp angle, which drives water up under lap siding.
Apply a cleaning solution designed for exterior surfaces before rinsing. This helps lift mildew and oxidation that plain water cannot remove. Allow the solution to dwell for several minutes, but do not let it dry on the surface. Rinse from the bottom up to prevent streaking. For delicate surfaces like stucco or older wood, consider lower pressure settings or a chemical wash instead. The EPA’s guidance on safe pressure washing practices recommends containing runoff to protect landscaping and local waterways.
Scraping, Sanding, and Repairing Damaged Wood
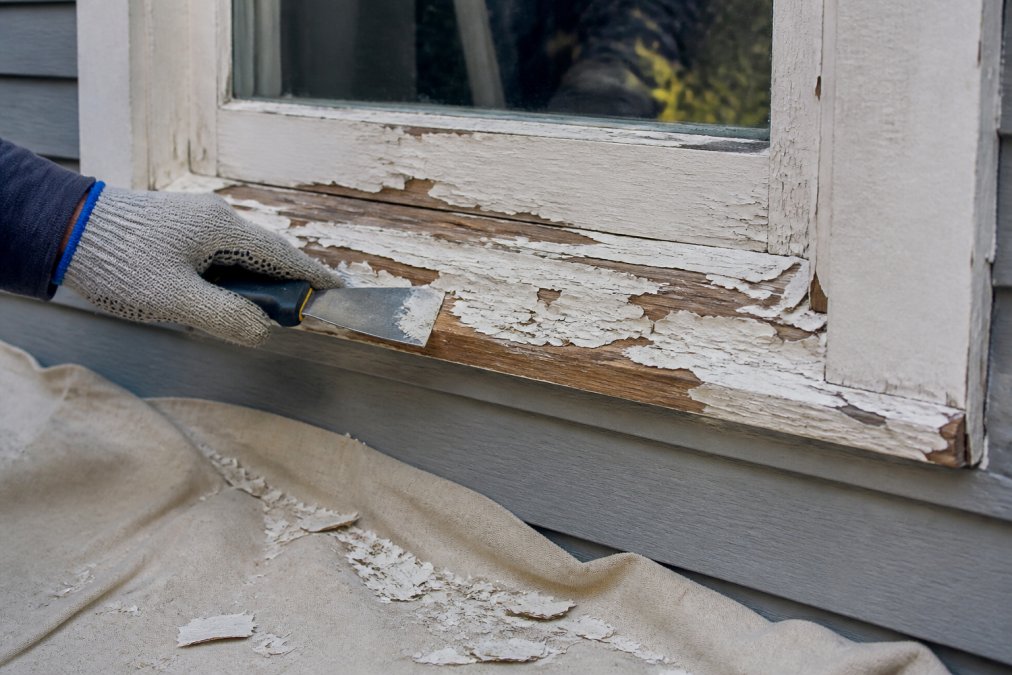
Once the surface is clean and dry, the real prep work begins. Scraping removes loose and peeling paint, while sanding smooths the transitions between remaining paint and bare wood. This step is tedious, but it is where you prevent future paint failure.
Start with a stiff paint scraper or a pull scraper with a sharp blade to remove all loose paint. Work with the grain of the wood to avoid gouging. After scraping, sand the entire area with 80 to 100 grit paper to feather the edges and create a smooth transition. For large flat areas, a power sander saves significant time, but finish by hand to reach corners and profiles.
Inspect the exposed wood for rot and damage. Soft, spongy, or discolored areas indicate wood rot that must be addressed. Use a screwdriver or awl to probe suspicious spots. Remove all compromised wood, then patch with a quality exterior wood filler or epoxy wood repair product. For structural damage, you may need to replace entire boards or sections of siding before painting.
Do not paint over active wood rot. The moisture trapped inside will continue to degrade the wood and will cause your new paint to fail from the inside out. Always repair or replace rotted wood completely before priming.
Caulking and Sealing for a Watertight Surface
Caulk is the first line of defense against moisture intrusion. Gaps around windows, doors, and trim allow water to penetrate behind the paint film, leading to blistering, peeling, and wood rot. Sealing these joints is a quick step that pays enormous dividends in paint longevity.
Use a high-quality paintable caulk designed for exterior use. Apply it to all joints where two different materials meet, such as where siding meets trim, and at inside corners. Cut the tube tip at a 45-degree angle and apply a continuous, smooth bead. Wet your finger or use a caulking tool to tool the bead, pressing it firmly into the joint and removing excess.
Do not caulk where siding pieces meet horizontally, as these are designed to allow water to escape. Sealing these drainage gaps traps moisture behind the siding. Focus on vertical joints and transitions. Allow the caulk to cure completely before priming or painting.
Best Exterior Paint Preparation Tools
Having the right tools makes the difference between a manageable project and a miserable one. While you do not need professional-grade equipment, investing in quality tools saves time and produces better results.
For scraping, a carbide-tipped scraper holds its edge longer than standard steel. A multi-tool with a scraper attachment is excellent for tight corners and intricate trim work. For sanding, an orbital sander with dust collection keeps the work area clean and reduces airborne particles. A sanding block reaches profiles that power tools cannot.
Beyond the basics, a few specialty items are worth the investment. A moisture meter tells you whether wood is dry enough to paint, preventing adhesion problems. Painter’s tape protects trim and hardware. Drop cloths and plastic sheeting shield landscaping and walkways. Personal safety gear, including a respirator, goggles, and gloves, is non-negotiable when working with paint removers and sanding dust.
| Tool | Primary Use | Why It Matters |
|---|---|---|
| Carbide scraper | Removing loose paint | Stays sharp, reduces effort |
| Orbital sander | Smoothing surfaces | Faster, dust collection |
| Moisture meter | Testing wood dryness | Prevents adhesion failure |
| Painter’s tape | Protecting edges | Clean, sharp lines |
| Exterior caulk | Sealing joints | Blocks moisture intrusion |
Material-Specific Prep: Wood, Vinyl, and Stucco
Not all siding is created equal. The best ways to prepare home exterior surfaces vary significantly depending on the material, and on the climate where you live. A one-size-fits-all approach is why so many paint jobs fail within two years. Here’s the granular breakdown by siding type, including the climate-specific adjustments most guides ignore.
Wood Siding: The Full Treatment
Wood requires the most intensive prep of any siding material. The process is straightforward but unforgiving: scrape, sand, repair, prime, and paint. The order matters, and so does the timing.
Moisture content is the gatekeeper. Before you apply primer to bare wood, the moisture content must be below 15 percent, most paint manufacturers recommend 12 to 14 percent for optimal adhesion (woodworks.org). A moisture meter is the only reliable way to know. In humid climates like the Southeast or Pacific Northwest, wood can take three to five dry days after pressure washing to reach acceptable moisture levels. In arid climates, wood may dry in 24 hours but can also dry too quickly, causing the grain to raise and the surface to become brittle.
Grain raising is a real phenomenon. When you wet wood, the fibers swell and stand up. If you prime over raised grain, you get a rough, sandpaper-like finish that telegraphs through your topcoat. The fix is to sand bare wood with 100-grit paper after it dries, knock down the raised grain, then prime. Some pros do a second light sanding with 120-grit after priming to smooth any residual roughness before the topcoat.
Knots and resin bleed require special attention. Pine, fir, and other softwoods commonly used for siding have knots that exude resin for years after the tree is cut. If you prime over a knot without sealing it, the resin bleeds through and stains your paint. Use a shellac-based primer specifically on knots and resinous areas before applying your regular wood primer.
Climate-specific adjustments for wood:
- High humidity (Southeast, Gulf Coast, Pacific Northwest): Watch for mildew growth on the surface before painting. Treat with a mildewcide wash and allow extra drying time. Consider a primer with mildewcide additives.
- Salt air (Coastal regions): Salt deposits on wood are hygroscopic, they attract moisture. A thorough rinse with fresh water after pressure washing is essential. Use a corrosion-resistant primer and topcoat formulated for coastal exposure.
- Extreme heat and UV (Southwest, inland California): Wood dries fast and checks under intense sun. Prime bare wood the same day you sand it to prevent moisture loss and surface degradation.
Vinyl Siding: Less Is More, But Not Zero
Vinyl siding is lower maintenance than wood, but it still requires preparation, and the mistakes homeowners make with vinyl are different from wood.
The heat problem is real. Vinyl expands and contracts significantly with temperature changes, up to 1/2 inch on a 40-foot run between winter and summer. If you paint vinyl a darker color than the original, it absorbs more heat, causing panels to warp, buckle, and even melt in extreme cases. The general rule: never paint vinyl a color darker than the original, and stick with colors that have a Light Reflectance Value (LRV) of 55 or higher.
Cleaning vinyl requires the right chemistry. Pressure washing vinyl is effective, but you must use a low-pressure setting (1,200 to 1,500 PSI) and a wide fan tip. Higher pressure forces water behind the panels, where it can’t escape and promotes mildew growth. For mildew and oxidation, use a vinyl-safe cleaning solution, oxygen bleach (sodium percarbonate) works well and is environmentally friendly. Avoid chlorine bleach, which can yellow the vinyl and damage landscaping.
Inspect for warping and cracks. Vinyl panels that are warped, cracked, or buckled need replacement before painting. Painting over damaged vinyl doesn’t fix the underlying issue, and the new paint will crack along the damage lines. Check the locking channels where panels connect, if they’re damaged, water gets behind the siding.
Caulk selection matters. Use a high-quality, paintable silicone or hybrid caulk specifically formulated for vinyl. Standard acrylic latex caulk doesn’t have the flexibility to handle vinyl’s thermal movement and will crack within a season. Apply caulk only at vertical joints and transitions, never seal the horizontal overlap joints, which are designed to allow water drainage and air circulation.
Climate-specific adjustments for vinyl:
- Extreme cold (Upper Midwest, Northeast): Vinyl becomes brittle below freezing. Do not scrape, sand, or apply pressure to vinyl when temperatures are below 50°F, panels can shatter.
- Intense sun (Southwest): Check for UV degradation, chalking, fading, or a powdery residue on the surface. This chalk must be washed off completely or paint won’t adhere.
Stucco: The Porous Challenge
Stucco is a cement-based material that is highly porous and alkaline. These two characteristics drive every prep decision.
Alkalinity is the silent killer. Fresh stucco has a pH of 12 to 13, which is highly alkaline. Standard latex paint applied over fresh stucco will saponify, the alkali attacks the paint binder, causing it to turn to soap and wash away. New stucco must cure for 30 to 60 days before painting, and even then, it requires a dedicated masonry primer formulated for high-alkalinity surfaces.
Cracks are entry points for water. Hairline cracks (less than 1/16 inch) can be filled with a flexible acrylic caulk designed for masonry. Larger cracks need a stucco patching compound applied in layers, with each layer allowed to cure. Do not paint over cracks without repairing them, water gets in, freezes, expands, and causes the stucco to spall.
Cleaning stucco requires gentleness. Pressure washing stucco at high pressure forces water into the porous surface, where it can take weeks to dry out. Use a low-pressure wash (800 to 1,200 PSI) with a wide fan tip, or better yet, use a chemical wash with a soft-bristle brush. Never use a metal scraper on stucco, it will gouge the surface.
Efflorescence is a warning sign. White, chalky deposits on stucco indicate that moisture is migrating through the wall and depositing salts on the surface. If you see efflorescence, you have a moisture problem that must be diagnosed and fixed before painting. Painting over efflorescence traps the salts and moisture, causing the paint to blister and peel.
Climate-specific adjustments for stucco:
- Freeze-thaw cycles (Northeast, Mountain West): Stucco is vulnerable to freeze-thaw damage. Ensure all cracks are sealed before winter, and use a breathable masonry paint that allows moisture vapor to escape.
- High humidity (Southeast): Stucco stays damp longer in humid climates. Check moisture content with a moisture meter before priming, it should be below 15 percent.
- Desert climates (Southwest): Stucco is exposed to intense UV and wide temperature swings. Use a high-quality elastomeric coating or masonry paint with UV stabilizers.
Never paint over stucco that shows signs of moisture intrusion, efflorescence, dark staining, or soft spots. The moisture will continue to degrade the stucco and will cause your new paint to fail from the inside out. Diagnose and fix the moisture source before any prep work begins.
A Quick Reference by Material
| Siding Material | Primary Prep Focus | Critical Mistake to Avoid | Ideal Primer Type |
|---|---|---|---|
| Wood | Scrape, sand, moisture check | Painting over raised grain or knots | Exterior wood primer; shellac on knots |
| Vinyl | Low-pressure wash, panel inspection | Painting darker than original | Bonding primer for vinyl |
| Stucco | Crack repair, pH neutralization | High-pressure washing | Masonry primer for high alkalinity |
This material-specific approach, combined with climate awareness, is what separates a paint job that lasts five years from one that lasts fifteen. The extra time you spend understanding your siding’s unique requirements is the best investment you can make in your home’s exterior.
How Long Does Exterior House Prep Take?
Homeowners consistently underestimate the time required for proper preparation, but the real question isn’t just about hours, it’s about whether your time is worth the money you’ll save doing it yourself. A realistic timeline depends on the size of the home, the condition of the existing paint, and the number of stories. As a general rule, preparation takes two to three times longer than the actual painting.
For a single-story home in good condition, expect to spend two to three days on cleaning, scraping, and light sanding. A two-story home with peeling paint and wood rot can easily take a full week or more. This is the stage where many DIYers rush, and it is precisely where corners should not be cut.
The Real Cost of Your Time
Before you commit to the DIY route, run a simple calculation. Take the number of hours you realistically expect to spend on prep work and multiply it by what you’d earn per hour at your job. For a 1,800-square-foot ranch home with moderate peeling, you’re looking at 25 to 35 hours of prep work alone. At $30 per hour of your time, that’s $750 to $1,050 in opportunity cost, before you buy a single gallon of primer.
Now compare that to what professional prep services charge. Most exterior painting contractors in the United States quote prep work at $25 to $50 per hour, or they bundle it into a total project bid. For that same 1,800-square-foot ranch, a professional crew will typically complete the full prep scope, pressure washing, scraping, sanding, caulking, and priming, in two to three days using a team of two to three workers. The labor cost for professional prep alone typically lands between $800 and $1,500, depending on your region and the condition of the siding.
The math gets interesting when you factor in tool costs. A quality pressure washer rental runs $80 to $120 per day. A carbide scraper, orbital sander, and moisture meter will set you back another $150 to $250. Add in drop cloths, painter’s tape, respirator masks, and caulk, and you’re at $300 to $500 in supplies before you account for your own labor.
When DIY Makes Sense
DIY prep is the right call when you have more time than money, when the home is a single story with minimal peeling, or when you genuinely enjoy the work. It also makes sense if you’re prepping a small area, say, just the trim or a single gable end, where the tool investment is minimal and the project fits into a single weekend.
When to Call a Professional
Professional prep is worth every penny when you’re dealing with any of the following situations:
- Two-story or taller homes: Ladder and scaffolding setup, plus the physical risk of working at height, adds hours and danger that professionals are equipped to handle safely.
- Extensive wood rot: If you’re probing soft spots in more than a few boards, the repair work goes beyond patching. Replacing siding sections requires carpentry skills most homeowners don’t have.
- Lead paint concerns: Homes built before 1978 likely contain lead-based paint. Disturbing it creates hazardous dust. The EPA’s Renovation, Repair, and Painting (RRP) Rule requires certified contractors to follow specific containment and disposal procedures. If you’re not RRP-certified, you should not be scraping pre-1978 siding.
- Tight timelines: If rain is forecast in five days and you have a full week of prep ahead, a professional crew can compress that into two days and get you primed before the weather turns.
Get three written quotes from licensed and insured exterior prep or painting contractors. Ask each to itemize the prep scope separately from the painting scope. This gives you an apples-to-apples comparison and a clear picture of what professional prep actually costs in your market.
A Realistic Phased Schedule
Whether you DIY or hire out, breaking the project into phases helps manage the workload. Dedicate one day to pressure washing and letting the surface dry. Reserve the next day for scraping and sanding. Use a third day for repairs, caulking, and priming. This staggered approach allows each step to dry and cure properly before the next begins. If you’re hiring professionals, ask for their schedule in writing so you know exactly what happens on each day of the project.
Final Inspection and Priming Before Paint
Before any primer touches the surface, conduct a final inspection. Run your hand over the siding to feel for rough spots or remaining loose paint. Look for missed areas around windows, under eaves, and behind downspouts. Check that all caulk is applied and cured. Confirm the forecast calls for dry weather with moderate temperatures.
Priming is the final step in surface preparation, and it is not optional. Primer seals bare wood, provides a uniform base for the paint, and promotes adhesion. For bare wood, use a high-quality exterior wood primer. For previously painted surfaces in good condition, a bonding primer helps the new topcoat adhere. For stained or chalky surfaces, use a stain-blocking primer.
Prime all bare wood and repaired areas at minimum, but priming the entire surface yields the most consistent finish. Spot-primed areas can flash through the topcoat, creating uneven sheen. Allow the primer to dry completely according to the manufacturer’s instructions before applying paint. This creates the ideal surface for the topcoat to bond, ensuring the longevity your preparation work has earned.
Preparing a home exterior for paint is demanding work that tests patience and attention to detail. The process is time-consuming, physically tiring, and easy to rush. Yet the longevity of your paint job is decided entirely in these preparation stages, not at the paint store. When the prep is done right, the paint adheres, the finish lasts, and the home is protected from the elements for years to come. When it is done poorly, no amount of expensive paint will save the project. For homeowners who would rather spend their weekend enjoying their property than scraping and sanding it, professional help is available. Simply Superior Window Cleaning offers comprehensive exterior pressure washing and maintenance services throughout Ventura and North LA Counties, with technicians trained to prepare surfaces safely and effectively. Schedule a free quote and let the experts handle the hard work.
Frequently Asked Questions
What is the best way to prep my house for exterior painting?
Start by protecting plants and windows with plastic sheeting and painter’s tape. Clean the siding with a pressure washer to remove dirt, mildew, and chalk. After it dries, scrape away loose or peeling paint, sand rough edges, and repair wood rot with wood filler. Caulk gaps around windows and trim, then apply a quality primer to bare wood. This sequence creates a clean, stable surface for maximum paint adhesion.
How do you clean exterior siding before painting?
A pressure washer is the most effective tool for cleaning exterior siding before painting. Use a fan tip and a cleaning solution designed for house washing. Work from the bottom up to avoid streaking, and keep the nozzle moving to prevent damage. For vinyl siding, use a low-pressure setting to avoid forcing water behind the panels. Let the siding dry completely for 24 to 48 hours before checking the moisture content.
What tools are essential for exterior home preparation?
Essential tools include a pressure washer, paint scraper, orbital sander, and a putty knife. You will also need paintable caulk, wood filler, primer, drop cloths, plastic sheeting, and painter’s tape. For safety, use a sturdy ladder or scaffolding, and wear safety gear like goggles, a respirator, and gloves. A moisture meter helps confirm the wood is dry enough to prime.
How long does exterior house prep take?
For a typical 2,000 square foot home, expect to spend 2 to 4 days on preparation. Pressure washing takes one day, including drying time. Scraping, sanding, and repairing damaged areas takes another 1 to 2 days, depending on the condition of the siding. Caulking and priming adds a final day. Weather delays and hard-to-reach areas can extend the timeline.
Is it better to roll or spray exterior house paint?
Spraying is faster and covers large, flat areas more evenly, but it requires masking everything you do not want painted. Rolling provides better penetration into porous wood and is easier to control on trim and corners. Many professionals use a hybrid approach: spray the main walls, then back-roll while the paint is wet to work it into the surface. This method offers speed and strong adhesion.
How do I protect my landscaping when prepping my home exterior?
Before any pressure washing, scraping, or painting, water your plants thoroughly. Cover shrubs and flower beds with plastic sheeting or lightweight drop cloths to shield them from paint drips and chemical runoff. Use painter’s tape to secure the sheeting around the base of the house. Remove the coverings as soon as the work is done so plants can get air and sunlight.