
Last Updated: November 13, 2026
Quick Summary
To protect landscaping during professional window washing, pre-wet soil and foliage with plain water, cover delicate plants with breathable fabric, redirect runoff away from beds, and rinse plants within a few hours after the crew leaves. Ask your provider which method and products they use, and request low pressure near fragile areas.
- Walk the perimeter with the crew lead and flag sensitive plants before equipment comes off the truck.
- Drape breathable fabric, not plastic sheeting, over sensitive plants and window screens.
- Move potted plants at least 3 feet from the foundation before the crew arrives.
- Pure water through a water-fed pole carries the lowest plant risk of the three methods.
- Photograph any leaf spotting, wilting, or browning within 24 hours as a record.
Table of Contents
- Why Professional Window Washing Puts Landscaping at Risk
- How to Protect Plants During Window Cleaning: 7 Steps
- Step 1: Walk the Property and Flag Sensitive Areas
- Step 2: Pre-Wet Soil and Foliage Before the Crew Arrives
- Step 3: Cover Delicate Plants with Breathable Barriers
- Step 4: Redirect Runoff Away from Flower Beds
- Step 5: Choose Low-Pressure Methods for Fragile Areas
- Step 6: Rinse Plants After Window Washing
- Step 7: Inspect and Document Damage Within 24 Hours
- Plant-Safe Window Cleaning Products: What to Ask For
- Preparing Landscaping for Window Cleaners: A Homeowner Checklist
- Rinsing Plants After Window Washing: Timing and Technique
- Window-Cleaning Methods Compared: Pure Water, Squeegee, and Chemical-Assisted
- What to Confirm With Your Window-Cleaning Provider Before They Start
- Schedule a Walkthrough With Simply Superior Window Cleaning
- Frequently Asked Questions
Why Professional Window Washing Puts Landscaping at Risk
Window washing looks harmless from the driveway, but it takes planning to protect landscaping. Water and soap hit the glass, a squeegee pulls it clean, and the crew moves on. The problem is everything that leaves the window: soapy runoff, overspray from hoses, and cleaning solution drifting onto whatever sits below.
Window washing can leave preventable damage behind, such as leaf spotting on perennials, wilting annuals under a first-floor sill, and soil that stays saturated when runoff pools in a flower bed. None of it is dramatic, and all of it is avoidable.
Three forces do the damage. Cleaning solution and hard-water minerals spot foliage. Water weight and runoff saturate soil and disturb roots. Foot traffic and ladder placement crush delicate plants near the foundation.
The University of California Statewide Integrated Pest Management Program notes that plants already stressed by drought, heat, or poor soil recover more slowly from any new injury, which is why the same overspray that barely marks a healthy shrub can set back a struggling one for a season.
How to Protect Plants During Window Cleaning: 7 Steps
Protecting landscaping during professional window washing comes down to a handful of steps, run before, during, and after the visit. Most take minutes.
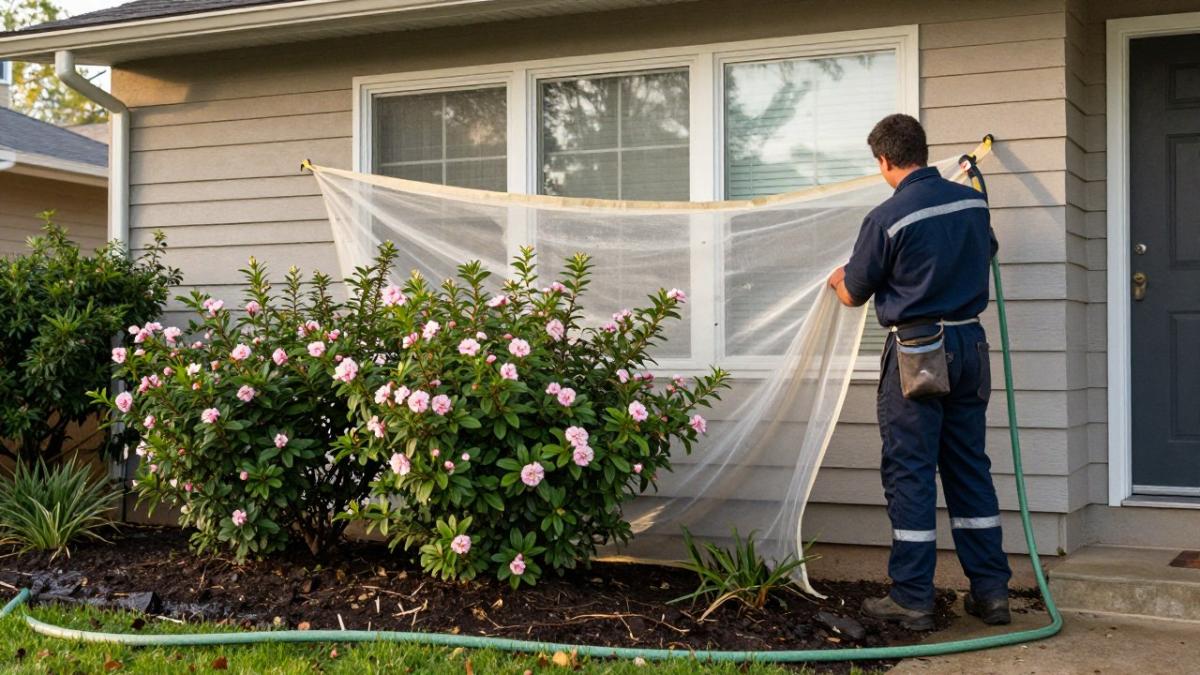
Step 1: Walk the Property and Flag Sensitive Areas
Walk the perimeter with the crew lead before any equipment comes off the truck. Point out what matters: newly planted perennials, hydrangeas, vegetable beds, potted plants, and anything under a window that gets overspray. Mark the spots with garden flags or stakes so the crew can see them from the ladder.
Step 2: Pre-Wet Soil and Foliage Before the Crew Arrives
Soak the soil and rinse foliage with plain water before cleaning starts. Wet leaves and saturated soil dilute any cleaning solution that lands on them and reduce how much the plant takes up through its roots. Run a hose on low pressure for a few minutes per bed, and do it the morning of the visit, not the day before.
Step 3: Cover Delicate Plants with Breathable Barriers
Drape breathable fabric, not plastic sheeting, over sensitive plants and window screens. Plastic traps heat and can cook foliage underneath on a warm day. Old bed sheets, frost blankets, or lightweight tarps work well. Leave gaps at the base for airflow, and weight the edges with stones rather than tying them tight. For screens specifically, preventing window screen damage during cleaning covers the covering approach in more detail.
Step 4: Redirect Runoff Away from Flower Beds
Aim downspouts and hoses so water lands on lawn, gravel, or pavement instead of soil. On a two-story house, water from upper windows can pour straight into a bed below the sill. Set a splash block or a temporary board at the base of the wall to divert runoff. Water management matters more than most homeowners expect, because poor drainage, not the soap, causes most root problems.
Step 5: Choose Low-Pressure Methods for Fragile Areas
Ask for low pressure near delicate plants to protect landscaping. Soft washing and water-fed pole work use less force than pressure washing. Pressure washing belongs on pavement and siding, not on a window frame next to a rose bush. When a crew uses a squeegee method with a bucket, ask them to keep the bucket off the soil.
Step 6: Rinse Plants After Window Washing
Rinse plants with plain water within a few hours of the crew leaving. A post-cleaning rinse washes off any dried cleaning solution and hard-water minerals before they set. Use a gentle spray, not a hard jet, and rinse both sides of the leaves. This single step prevents most leaf spotting.
Step 7: Inspect and Document Damage Within 24 Hours
Walk the beds the same day and photograph anything that looks off. Leaf spotting, wilting, or browning shows up within hours when it happens at all. Photos with a timestamp give you a record if you need to follow up with the provider. Most issues are cosmetic and fade, but a paper trail protects you either way.
Plant-Safe Window Cleaning Products: What to Ask For
Ask your provider what they use before the visit, not after. The answer matters more for window cleaning than for most exterior work, because window solutions are designed to sheet off glass and dry fast, which means residue can land on foliage below the sill and set within minutes in direct sun.
Plant-safe window cleaning products are typically formulated to be biodegradable and mild, and buyers can check a product’s safety data sheet for its actual ingredients. But “plant-safe” is a category, not a guarantee. The practical question is which method the crew uses, because each one exposes your landscaping to a different mix of water, soap, and minerals.
Watch out: “Eco-friendly” on a label means little on its own. Ask for the product name and check the safety data sheet, which lists the actual ingredients and first-aid measures. A crew that cannot name its solution is a crew that has not thought about your plants.
Preparing Landscaping for Window Cleaners: A Homeowner Checklist
Use this checklist the morning of the visit. It takes about 30 minutes for a typical yard.
- Water beds and rinse foliage with plain water
- Stake or flag newly planted and sensitive plants
- Drape breathable covers over delicate plants and screens
- Move potted plants at least 3 feet from the foundation
- Clear hoses, tools, and garden decor from the work path
- Set a splash block or board where roof runoff hits a bed
- Note anything the crew should avoid and mention it at arrival
If you want a fuller walkthrough of the home side of prep, our home preparation guide covers the rest of the property. A step-by-step window prep guide is also useful if this is your first professional cleaning.
Rinsing Plants After Window Washing: Timing and Technique
Rinse as soon as possible after the crew finishes, and sooner on a hot day. Cleaning solution dries fast in direct sun, and once residue sets on a leaf, it takes more water to remove.
Use a hose on a gentle shower setting and work from the top of the plant down. Rinse both leaf surfaces, then water the soil lightly to flush anything that dripped down. Skip the rinse if rain is due within the hour; nature will handle it.
Window-Cleaning Methods Compared: Pure Water, Squeegee, and Chemical-Assisted
| Method | How It Works | Plant Risk | Best For |
|---|---|---|---|
| Pure water | Deionized water through a water-fed pole, no soap | Lowest | Beds under windows, tall glass |
| Squeegee | Soap solution, blade, and bucket | Moderate | Standard residential glass |
| Chemical-assisted | Cleaning solution, sometimes stronger | Highest | Heavy buildup, hard-water stains |
What to Confirm With Your Window-Cleaning Provider Before They Start
A short, structured confirmation call before booking closes the gap, because window cleaning sends water and solution down from above, and the crew’s choices at the glass determine what reaches your beds.
Run through these points on the phone or at the estimate:
- Products and method. Ask which method they plan to use on each elevation and what solution goes with it. Request the product name and safety data sheet for anything beyond pure water.
- Runoff path. Ask how they keep water from upper windows out of beds below the sill, and whether they use splash blocks, diverters, or a rinse-and-redirect routine.
- Plant identification. Walk the property or send photos of anything newly planted, edible, or drought-stressed, and ask the crew lead to confirm those areas are flagged before equipment comes off the truck.
- Cover policy. Confirm whether the crew covers plants or expects the homeowner to, and whether covers are breathable and removed the same day.
- Rinse plan. Ask who rinses foliage after the visit and how soon, since residue sets faster on a hot, sunny day.
- Damage response. Ask what the provider does if a plant shows spotting or wilting after service, and get the answer in writing.
A provider who answers clearly has done this before. A provider who shrugs is telling you something. Our guide on what to expect from professional window washing walks through the on-site process so you know what a normal visit looks like.
Schedule a Walkthrough With Simply Superior Window Cleaning
Protecting landscaping during professional window washing is a two-way job: the homeowner preps the beds, and the crew manages water and products on site.
Our technicians undergo rigorous classroom and on-the-job training, and our team holds monthly safety meetings. We handle residential and commercial properties, including buildings up to four stories, plus solar panel cleaning and gutter maintenance, and we offer virtual quotes. If you want to compare providers first, see our window cleaning comparison.
Get started with Simply Superior Window Cleaning and schedule a walkthrough before your next cleaning.
Your landscaping does not have to take a hit every time the windows get washed. Call Simply Superior Window Cleaning for a virtual quote, and we will build a plant-safe plan around your property.
Frequently Asked Questions
How do professional window cleaners protect plants while washing windows?
Professional crews protect landscaping by pre-wetting soil and foliage, covering delicate plants with breathable tarps or plastic sheeting, and redirecting runoff away from flower beds. They can also choose low-pressure methods for sensitive areas and rinse plants after the job. Ask your provider to walk the property with you before starting so they can flag perennials, shrubs, and grass that need extra care.
Can window-cleaning products harm flowers, shrubs, or grass?
Some conventional glass cleaners contain ammonia, alcohol, or surfactants that can spot leaves or burn roots if they concentrate in soil. Plant-safe window cleaning products are typically formulated to be milder, and buyers can ask a provider for the product name and safety data sheet. Even with safer products, overspray and runoff can still damage delicate plants, so pre-wetting and rinsing remain important safeguards.
Should plants be watered before or after exterior window washing?
Water plants thoroughly the morning of the cleaning. Pre-wetting soil and foliage dilutes any cleaning solution that drifts onto leaves and helps the plant recover faster. After the crew leaves, rinse plants again with a garden hose to wash away residue. Avoid watering immediately before the crew arrives if the soil is already saturated, since runoff will carry more material into storm drains.
What should I do if cleaning solution gets on my landscaping?
Rinse the affected area right away with plain water from a garden hose, focusing on leaves and the top inch of soil. If a plant shows wilting or leaf spotting in the next 24 to 48 hours, take photos and contact your window-cleaning provider. Most plant-safe solutions wash off without lasting harm, but quick rinsing limits chemical exposure and protects roots in flower beds.